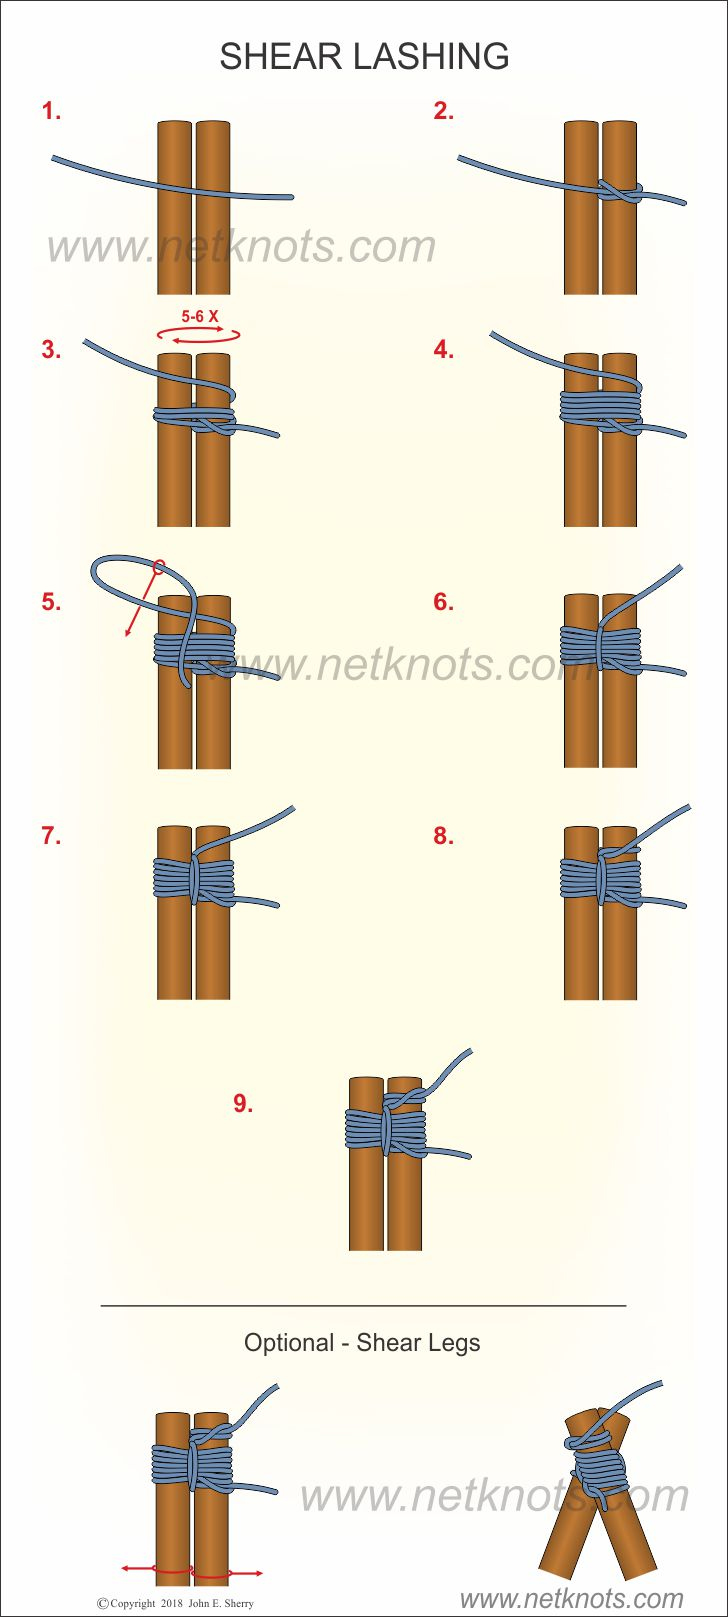
Shear lashing sometimes spelled “sheer lashing” and sometimes incorrectly called a round knot, is often used to bind two poles together, or to create an A-frame (by spreading the two poles after the knot is complete). Here’s a step-by-step guide on how to do shear lashing.
A Basic Guide to Do Shear Lashing
Some sites and books make the mistake of saying that a shear lashing can also be used to repair or reinforce a broken pole, or to attach two poles in the same direction to extend the overall length of short poles.
You actually use a round knot for this. While the two may seem similar, round knots do not incorporate frapping turns, which shear lashings do.
You may be wondering why we chose to include “round knot” in the title of this guide if the focus is on shear lashings.
We find that it’s useful to include common alternative names, even if they’re technically incorrect, to make it easier for readers to find what they’re looking for.
We’ve also included a short guide on tying a round knot, to better illustrate the differences.
Steps for Tying a Shear Lashing
Here’s a quick step-by-step guide on how to tie shear lashing, with a graphic courtesy of NetKnots.com.

- Line your two poles or stave up, side-by-side, preferably in the upright position.
- Attach one end of your cordage to the first pole using a Clove Hitch, pulling tight to ensure the knot is secure and won’t shift.
- Begin the Shear Lashing by wrapping the working end of your cordage around both poles, pulling tight with each turn; do so 5 to 6 times.
- Pull tight one last time, but make sure there’s still as much space between the two poles as your cordage is thick (if your cordage is fairly pliable, the gap can be a little narrower – just so long as you can still squeeze it in).
- Wrap your cordage around again, as if to complete another full turn, but instead of bringing it all the way back to the front (like in step 3), tuck the working end between your poles so that it wraps around the second one (not the one with the first Clove Hitch).
- Make a frapping turn by wrapping the cordage around itself, between the two poles, and pull tight.
- Complete a second frapping turn and pull tight again.
- End the Shear Lashing with a second Clove Hitch around the same pole you started with.
- For a more secure lashing, add another Clove Hitch immediately after.
Optional – Shear Legs
- If you want to use the Shear Lashing to make an A-frame, follow the same steps as above but leave the wraps (from step 3) a little looser.
- After tying the first Clove Hitch (step 8), pull the legs apart, to either the desired spread or as far as your lashing will allow you to (depending on which happens first).
- Holding the legs apart at this desired width, make any necessary adjustments to the Shear Lashing for tension and stability before finishing with a second Clove Hitch (step 9).
Steps for Tying a Round Knot
If you were under the impression that shear lashings and round knots are the same thing, you might have been hoping that knowing how to tie a shear lashing will help you connect two shorter poles to extend their overall length.
But to do this, you need a round knot – preferably two!
Here’s a quick step-by-step guide on how to tie shear lashing, with a short tutorial video from AnimatedKnots.com.
- Start by laying both poles next to each other, with their ends overlapping exactly where you want to connect them.
- Connect the poles with a Clove Hitch, wrapped around both poles simultaneously and pulled tight.
- Wrap the working end of your cordage around both poles, pulling tight with each turn; do so 6 to 8 times.
- End with another Clove Hitch, wrapped around both poles simultaneously and pulled tight.
- Optionally, repeat the process with the same length of cordage or with a second length, to better secure and support two shorter poles being connected to extend their overall length.
Knowing how to properly tie different knots and what each knot is best used for is an invaluable skill to have, especially when your survival relies on being able to do so!
How many knots do you know so far? Share the number in the comments section!
Up Next:
- 40 Essential Knots Every Survivalist Needs To Know
- The Essential Lashing Skill: The Square Lash
- How To Tie A Square Knot | Step-By-Step Instructions
Feature Image via YT/Troop Leader


